Mostrar Mensagens

Esta secção permite-lhe ver todas as mensagens colocadas por este membro. De realçar que apenas pode ver as mensagens colocadas em zonas em que você tem acesso.


Mensagens - Xeontec

Páginas: 1 ... 4735 4736 [4737] 4738 4739 ... 4743
94721
Sony HMD-V200 service manual de serviço esquema diagrama schematic
HMD-V200

:aqui:
CONTEÚDO PREMIUM!! Apenas os usuários premium tem acesso a este conteúdo:

  • Para aceder a este conteúdo precisa adquirir uma subscrição PREMIUM.
    Pode adquirir uma subscrição CLICANDO AQUI
    Pode escolher uma subscrição com duração de 1 mês, de 6 meses ou de 1 ano.

94722
SONY HMD-A100
service manual de serviço esquema diagrama schematic

 :aqui:

94723
Daewoo L500B service manual de serviço esquema diagrama schematic

 :aqui:

94724
PANASONIC TX-D4L31 service manual de serviço - esquema schematic


 :aqui:

94725
Avarias resolvidas TV / Monitores CRT / DAEWOO Avarias resolvidas
« em: Agosto 11, 2008, 01:34:47 pm »
Daewoo chasis CN1151
Tela escura com uma franja vertical de 3cm do lado esquerdo.
Condensador 419 aberto de 4.7 uF /160 v.

Daewoo chasis CN1151
Não sintoniza.
Q804 em curto, R109 de 18R / 2w aberta e o zener D103 de 5.2 v. 1/2w em curto.

Daewoo Modelo DTQ-26S1FC  Chassis CN200I
Imagem delocada para a direita, franja vertical de aprox. 10cm do lado esquerdo.
Solução: R516 de 10k.

Daewoo chassis CN200A Modelos DTQ25S2FC, 26S1HC, 27S2FC, 29S1HC
Não liga.
condensador 806 de 100 mf

Daewoo chassis CN001 modelo 19P3FC
Não há alta voltagem.
C.I.901 TDA6107Q


94726
OUTRAS MARCAS / Códigospara telemóveis chineses.
« em: Agosto 10, 2008, 11:25:39 am »
Service codes BenQ:
software version: *#300#
test mode: *#302*20040615#
Service codes Pantech:
software version: *01763*79837#
service menu: *01763*476#
reset defaults (phone/user code reset to default): *01763*737381#
Service codes 3xx, 5xx:
software version: *#79#
software version: *#837#
Service codes VK200, VK2000, VK2010, VK2020, VK4000:
software version: *#79#
service menu: *#9998*8336# (hold #)
reset defaults (phone/user code reset to default): *#9998*7328# (hold #)
Service codes LG:
software version: 2945#*#
Service codes Sony-Ericsson:
J100 software version: #82#
Service codes Fly:
2040(i) reset defaults: *#987*99# Send
MX200 reset defaults: *#987*99# Send
MX200 software version: *#900# Send
SL300m reset defaults: *#987*99# Send
SL300m software version: *#900# Send
SL500m reset defaults: *#987*99# Send
SL500m software version: *#900# Send
MP500 reset defaults: *#987*99# Send
MP500 software version: *#900# Send
Set language to English: *#0044#
Set language to Russian: *#0007#
Service codes Konka:
C926 software version: *320# Send
C926 set default language: *#0000# Send
C926 set English language: *#0044# Send
Service codes GStar:
GM208 (Chinese Nokea 6230+) engineering menu: *#66*#
Set language to English: *#0044#
Set language to Russian: *#0007#
Service codes Motorola:
Motofone F3 software version: **9999* Send
C113, C114, C115, C115i, C116, C117, C118 software version: #02#*
C138, C139, C140 software version: #02#*
C155, C156, C157 software version: #02#*
C257, C261 software version: #02#*
V171, V172, V173 software version: #02#*
V175, V176, V176 software version: #02#*
C168, W220 software version: *#**837#
W208, W375 software version: #02#*
ZTE Mobile:>1- *938*737381#
2- PHONE WILL DIPLAYED DONE
3- POWER OFF YOUR PHONE AND POWER ON AGAIN
alcatel:>E205
unlocking phone code,only press***847# without simcard

E900 software version: *#5002*8376263#
E900 full reset: *2767*3855#
Service codes Spice:
S404 enable COM port: *#42253646633# -> Device -> Set UART -> PS -> UART1/115200
S410 engineer mode: *#3646633#
S900 software version: *#8375#
S900 serial no: *#33778#
Service codes Philips:
S200 enable COM port: *#3338913# -> Device -> Set UART -> PS -> UART1/115200
Service codes "Chinese" models:
default user code: 1122, 3344, 1234, 5678
Engineer mode: *#110*01#
Factory mode: *#987#
Enable COM port: *#110*01# -> Device -> Set UART -> PS Config -> UART1/115200
Restore factory settings: *#987*99#
LCD contrast: *#369#
software version: *#800#
software version: *#900#
Service codes BenQ:
software version: *#300#
test mode: *#302*20040615#
Service codes Pantech:
software version: *01763*79837#
service menu: *01763*476#
reset defaults (phone/user code reset to default): *01763*737381#
Service codes VK-Mobile 3xx, 5xx:
software version: *#79#
software version: *#837#
service menu: *#85*364# (hold #)
Service codes VK200, VK2000, VK2010, VK2020, VK4000:
software version: *#79#
service menu: *#9998*8336# (hold #)
reset defaults (phone/user code reset to default): *#9998*7328# (hold #)
Service codes LG:
software version: 2945#*#
KG300 NVRAM format: 2945#*# -> menu 15
Service codes Sony-Ericsson:
J100 software version: #82#
Service codes Fly:
M100 software version: ####0000#
2040(i) reset defaults: *#987*99# Send
MX200 reset defaults: *#987*99# Send
MX200 software version: *#900# Send
SL300m reset defaults: *#987*99# Send
SL300m software version: *#900# Send
SL500m reset defaults: *#987*99# Send
SL500m software version: *#900# Send
MP500 reset defaults: *#987*99# Send
MP500 software version: *#900# Send
Set language to English: *#0044#
Set language to Russian: *#0007#
Service codes Konka:
C926 software version: *320# Send
C926 set default language: *#0000# Send
C926 set English language: *#0044# Send
Service codes GStar:
GM208 (Chinese Nokea 6230+) engineering menu: *#66*#
Set language to English: *#0044#
Set language to Russian: *#0007#
Service codes Motofone-F3:
Motofone F3 software version: **9999* Send
***300* Set SIM Pin
***310* / ***311* SIM Pin ON | OFF
***000* Reset Factory settings
***644* Set Voicemail number
***260* / ***261* Auto keypad lock ON | OFF
***510* / ***511* Voice Prompts ON | OFF
***160* / ***161* Restricted Calling (Phonebook only) ON | OFF
***200608* Send: software version
***200606* Send: software version
***200806* Send: flex version
***250* / ***251* Keypad tones ON | OFF
***470* Select time format
***500* /***501* Prepaid Balance Display ON | OFF
***520* Change language
Service codes Motorola:
C113, C114, C115, C115i, C116, C117, C118 software version: #02#*
C138, C139, C140 software version: #02#*
C155, C156, C157 software version: #02#*
C257, C261 software version: #02#*
V171, V172, V173 software version: #02#*
V175, V176, V176 software version: #02#*
C168, W220 software version: *#**837#
W208, W375 software version: #02#*
and "yes"''

.................................................. ...............................
N95Pda and N95S Pinout
2x5
4:Rx
5:TX
6:GND
.................................................. ...............................
K1 Moto Pinout
4:Rx
5:Tx
6:Gnd
.................................................. ...............................
PDA ZT6618
1........8 pin mini Conector
3:Rx
4:TX
5:Gnd
.................................................. ...............................
Cect 8380
1..........8 pin mini Conector
1:Gnd
2:Rx
3:Tx
.................................................. ...............................
KG-200
4:Gnd
3:Tx
2:Rx
.................................................. ...............................
N91I
1..............12 pin Connector
.
5:Gnd . 12:Tx
6:Tx . 13:Rx
7:Rx .
==============================================
All Chinese Mobile Code And Pinouts
--------------------------------------------------------------------------------
hi
Service codes BenQ:
software version: *#300#
test mode: *#302*20040615#
Service codes Pantech:
software version: *01763*79837#
service menu: *01763*476#
reset defaults (phone/user code reset to default): *01763*737381#
Service codes 3xx, 5xx:
software version: *#79#
software version: *#837#
Service codes VK200, VK2000, VK2010, VK2020, VK4000:
software version: *#79#
service menu: *#9998*8336# (hold #)
reset defaults (phone/user code reset to default): *#9998*7328# (hold #)
Service codes LG:
software version: 2945#*#
Service codes Sony-Ericsson:
J100 software version: #82#
Service codes Fly:
2040(i) reset defaults: *#987*99# Send
MX200 reset defaults: *#987*99# Send
MX200 software version: *#900# Send
SL300m reset defaults: *#987*99# Send
SL300m software version: *#900# Send
SL500m reset defaults: *#987*99# Send
SL500m software version: *#900# Send
MP500 reset defaults: *#987*99# Send
MP500 software version: *#900# Send
Set language to English: *#0044#
Set language to Russian: *#0007#
Service codes Konka:
C926 software version: *320# Send
C926 set default language: *#0000# Send
C926 set English language: *#0044# Send
Service codes GStar:
GM208 (Chinese Nokea 6230+) engineering menu: *#66*#
Set language to English: *#0044#
Set language to Russian: *#0007#
Service codes Motorola:
Motofone F3 software version: **9999* Send
C113, C114, C115, C115i, C116, C117, C118 software version: #02#*
C138, C139, C140 software version: #02#*
C155, C156, C157 software version: #02#*
C257, C261 software version: #02#*
V171, V172, V173 software version: #02#*
V175, V176, V176 software version: #02#*
C168, W220 software version: *#**837#
W208, W375 software version: #02#*
ZTE Mobile:>1- *938*737381#
2- PHONE WILL DIPLAYED DONE
3- POWER OFF YOUR PHONE AND POWER ON AGAIN
alcatel:>E205
unlocking phone code,only press***847# without simcard

E900 software version: *#5002*8376263#
E900 full reset: *2767*3855#
Service codes Spice:
S404 enable COM port: *#42253646633# -> Device -> Set UART -> PS -> UART1/115200
S410 engineer mode: *#3646633#
S900 software version: *#8375#
S900 serial no: *#33778#
Service codes Philips:
S200 enable COM port: *#3338913# -> Device -> Set UART -> PS -> UART1/115200
Service codes "Chinese" models:
default user code: 1122, 3344, 1234, 5678
Engineer mode: *#110*01#
Factory mode: *#987#
Enable COM port: *#110*01# -> Device -> Set UART -> PS Config -> UART1/115200
Restore factory settings: *#987*99#
LCD contrast: *#369#
software version: *#800#
software version: *#900#
Service codes BenQ:
software version: *#300#
test mode: *#302*20040615#
Service codes Pantech:
software version: *01763*79837#
service menu: *01763*476#
reset defaults (phone/user code reset to default): *01763*737381#
Service codes VK-Mobile 3xx, 5xx:
software version: *#79#
software version: *#837#
service menu: *#85*364# (hold #)
Service codes VK200, VK2000, VK2010, VK2020, VK4000:
software version: *#79#
service menu: *#9998*8336# (hold #)
reset defaults (phone/user code reset to default): *#9998*7328# (hold #)
Service codes LG:
software version: 2945#*#
KG300 NVRAM format: 2945#*# -> menu 15
Service codes Sony-Ericsson:
J100 software version: #82#

default user code: 1122, 3344, 1234, 5678
Engineer mode: *#110*01#
Factory mode: *#987#
Enable COM port: *#110*01# -> Device -> Set UART -> PS Config -> UART1/115200
Restore factory settings: *#987*99#
LCD contrast: *#369#
software version: *#800#
software version: *#900#
set default language: *#0000# Send
set English language: *#0044# Send
set English language (new firmware): *#001# Send

94727
Note:The N73-5 RM-132 is a Non-3G variant of the N73 while the N73-1 RM-133 is a 3G variant and supports 3G in WCDMA 2100 Band.

To convert your N73-5 to N73-1 to support 3G you will need a CA-53 USB Data Cable,Nokia Phoenix Service Software 2007(2006 might also work) and a RM-133 Firmware.

Follow the steps mentioned below:

1]Plug the USB connector of the CA-53 Data Cable to your computers USB port but don't connect your phone yet.

2]Install the RM-133 Firmware

3]Open Phoenix Service Software 2007 and click maintain and add new user.

4]After adding details select the user and click OK.The Phoenix main window will open.

5]Now choose file menu and click on Open Product.

6]Select RM-133 from the list and click on OK.It will take some time to load since the phone is not connected.

7]Choose the flashing menu and click on Firmware Update.

8]The Firmware Update window will appear but since the phone is not connected it will take some time to load.

9]In the product code section select your product code.For eg APAC 1 or APAC 2,EURO 1 or EURO 2.

10]Now connect your phone to the PC by the CA-53 Data Cable and select PC Suite mode.

11]Click on OK in the Firmware Update window of Phoenix.Now after it verifies connectivity with the phone it will restart the phone and start flashing.Don't touch the phone while the flashing process otherwise you have the risk of a dead phone.

After this you can also change your N73 to N73 ME by just changing the product code via NSS or manually downloading the firmware and flashing it.

Backup all your important data such as contacts and messages before flashing.

You can void your warranty by converting your phone but it is not yet confirmed.

If you are a noob at flashing phones then please consult me before flashing.

If you don't have a CA-53 cable then you will need to purchase it.It is available at any Nokia shop btw it also comes with every N73.
__________________

94728
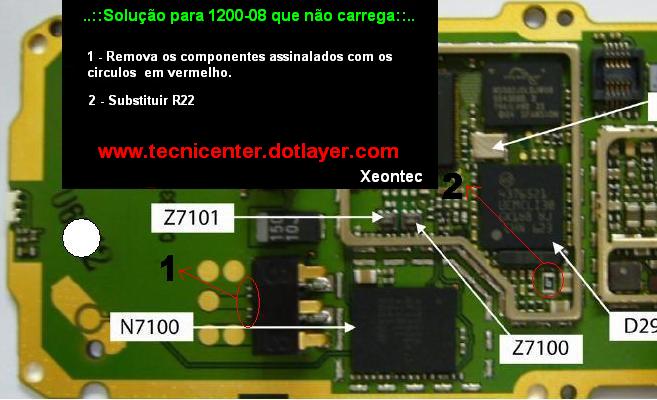
NOKIA MICROSOFT / Nokia 1200-08 não carrega.
« em: Agosto 10, 2008, 10:58:09 am »
Solução:


94729
NOKIA MICROSOFT / Nokia Phoenix Service Software 2008.20.9.34260
« em: Agosto 10, 2008, 10:33:10 am »
Changes/improvements made to from v 2008.4.7.32837 to v 2008.20.9.34260:

For GSM / WCDMA:
- E-51 USB flashing corrected
- Support for new products added: RM-381, RM-465, RM-468, RM-490, RM-
495, RM-496, 2LC, 2LB, HT-4, RM-386, RM-408, RM-409, RM-410, RM-
411, RM-416, RM-417, RM-419, RM-431, RM-437, RM-438, RM-439, RM-
450, RM-462 RM-469, RM-478, RM-479, RM-480, RM-481, RM-482, RM-
483, RM-499, RH-116, RH-117, RH-119

Known limitations/errors:
- None

Changes/improvements made to from v 2008.4.7.32837 to v 2008.20.9.34260: :

For CDMA:
- None

Known limitations/errors:
- FPS-11 should be used to revive “dead” Phones.


DOWNLOAD AQUI.

 :o

94731
GRUNDIG / Grundig cuc2030 , cuc2030n , cuc2040n , cuc2040
« em: Agosto 02, 2008, 09:58:35 pm »
 :aqui:

[anexo apagado pelo Administrador]

94732
Algumas vezes os projetos eletrônicos possuem orçamento apertado e você não pode gastar com um conversor MAX 232. Aqui estão algumas alternativas.

Normalmente nós usamos um circuito com MAX 232 como esse:


 MAX 232 é um circuito integrado conversor de nível, que converte sinais TTL em RS232 e virse-versa. Ele fornece uma ótima rejeição de ruído e é mais robusto à descargas e curtos. Se o seu projeto for mais avançado, você deve utilizar um CI especializado para esta tarefa. No entanto, soluções especializadas são mais caras que as outras.


Este é um exemplo de circuito com transistor para executar a tarefa de conversão:


Os transistores podem ser todos de uso geral. Este circuito é muito simples e trabalhar sem problemas. É a solução mais barata, pois requer apenas um par de transistor e quatro resistores. Os dois transistores executam um truque para ter a tensão negativa necessária por alguns PCs. Quando o PC não transmite dados, seu pino TX está com uma tensão negativa. A tensão negativa presente é então trazida através do resistor R3 ao pino RD (recepção) do PC.

Alternativamente, RS232 pode ser conseguido utilizando portas lógicas. Isto é acessível quando sua aplicação já está utilizando elementos lógicos e há portas sobreando em algum CI. Como alguns PCs trabalhar bem apenas com tensões positivas, tudo que nós precisamos é inverter a lógica do sinal e para isso utilizamos as portas lógicas. Por exemplo, utilizando o CI CMOS CD4066B:


E, é claro, utilizando circuitos NAND e NOR:


E não se esqueça de alimentar os CI's com 5V.

94733
RS232 Pin Assignments (DB25 PC signal set) Pin 1 Protective Ground

Pin 2 -> Transmit Data
Pin 3 -> Received Data
Pin 4 -> Request To Send
Pin 5 -> Clear To Send
Pin 6 -> Data Set Ready
Pin 7 -> Signal Ground
Pin 8 -> Received Line Signal Detector
(Data Carrier Detect)
Pin 20 -> Data Terminal Ready
Pin 22 -> Ring Indicator

RS232 Pin Assignments (DB9 PC signal set)

Pin 1 -> Received Line Signal Detector
(Data Carrier Detect)
Pin 2 -> Received Data
Pin 3 -> Transmit Data
Pin 4 -> Data Terminal Ready
Pin 5 -> Signal Ground
Pin 6 -> Data Set Ready
Pin 7 -> Request To Send
Pin 8 -> Clear To Send
Pin 9 -> Ring Indicator

Wiring up something nice and simple, for instance a plain old "dumb terminal", is just a matter of connecting Tx, Rx and Ground, right?
Usually Not. While the normal PC hardware might well run with just Tx, Rx and Ground connected, most driver software will wait forever for one of the handshaking lines to go to the correct level. Depending on the signal state it might sometimes work, other times it might not. The reliable solution is to loop back the handshake lines if they are not used.

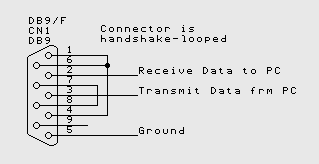
Handshake looping a PC serial connector

When the lines are handshake looped, the RTS output from the PC immediately activates the CTS input - so the PC effectively controls its own handshaking.

RS232 DB9 PC Loopback test plug
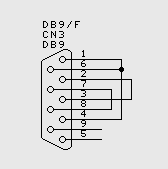


The PC loopback plug is a useful diagnostic tool. The loopback plug connects serial inputs to serial outputs so that the port may be tested. There is more than one way to wire up a loopback plug - but this is the most common.

RS232 DB25 PC Loopback test plug
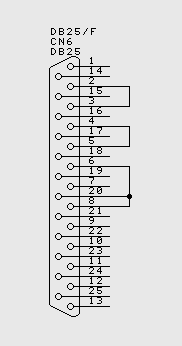

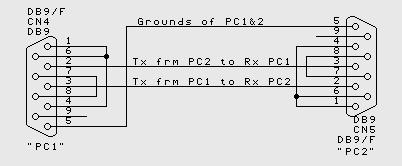
Connecting together two serial devices involves connecting the Rx of one device to the Tx of the other, and vice versa. The diagram below indicates how you would go about connecting two PC's together, without handshaking.

Connecting two PCs together using RS232, without handshaking


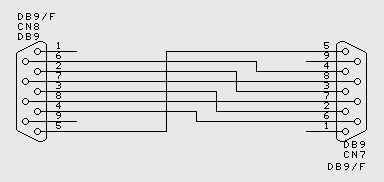
When Handshaking is required, generally RTS of one device connects to CTS of the other, and vice versa, and also DSR of one device connects to DTR of the other device, and vice versa. The particular requirements for different equipment may vary.

Connecting two PCs together using RS232, with handshaking


Using a 'T' plug and a PC to monitor comms
The gadget below is a quick 10 minute project that is really great for monitoring RS232 Comms using a PC.
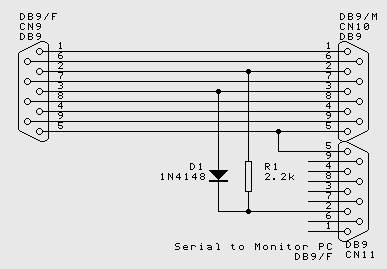


There are three sockets on our monitoring gadget. Two of them are connected straight through - you plug them in series with the devices you wish to monitor - and the third goes off to another monitoring PC.


The monitoring PC "Sees" on its serial port both sides of the serial conversation - that is it sees what is sent by PC1 and also what is sent by PC2. This can be a positive advantage, because you can see the serial conversation as it progresses between the two devices. Some serial protocols, however, talk "full duplex" meaning that one end can start transmitting while it is still receiving from the other end. This unit cannot monitor full duplex Comms - you will see gobble-dee-gook where the two transmissions overlap.


If you try this unit, you will be surprised how useful it is, and how often it works - mostly because many supposedly full duplex installations still talk half duplex in any case, because that is the sensible way to write the software. Not bad for one diode and a resistor, huh?


94734
Fico contente por saber que resolves-te o problema, eu quando o tive custou-me imenso a descobri-lo, quase desisti, por isso não me esqueci mais dele. :)

94735
Off topic / Re: Olá malta
« em: Julho 31, 2008, 11:04:04 pm »
Todas as ajudas são bem vindas, é preciso é ter vontade de colaborar porque há sempre qualquer coisa que nós sabemos ou alguma informação que temos que pode ser útil a outros membros da comunidade e para que funcione correctamente a troca de informação e o espirito de entreajuda é necessário que todos tomem a iniciativa de colocar aqui no fórum.

cumps


94736
Modo serviço / Service Mode / Marca Grundig
« em: Julho 31, 2008, 09:43:42 pm »
GRUNDIG  P37 TV
Service Mode
GRUNDIG P37 743 EURO,PRESS 'ITS+',PRESS'ITS-'PRESS'PROG+' PRESS'PROG-' GRUNDIGP37 POWER OFF, HOLD (PC) REMOTE CONTROL AND POWER ON EXIT=I

GRUNDIG ELEGANCE MFW 70-2501/8 CHASSI BEKO – C7 E C8 TV
Service Mode Chassi Beko – C7 e C8 Entrar em Mode Service 1º Tecla: i = Menu Principal 2º Teclas: 8, 5, 0, 0 (ok) = Service Menu Teclas P+ e P- Mov Tecla OK Entra


Grundig   CUC1805 CTV
ATS Reset Press and hold button VOL+ on the TV and switch the mains button ON. ATS bit is set.

Grundig   CUC1805 CTV
Child Lock Cancel Press VOL+, VOL-, PR-, PR+, OK.

Grundig   CUC1805 CTV
Default Values Entering Depress and hold the button 'P-' on the RC while switching on with the mains button. (This is only possible once on replacement of the NVM or uP).

Grundig   CUC1805 CTV
EPROM Version Nr. Press button 'i' to call up the 'Dialog Center' --> OK. The version number is shown by pressing the 'AUX' button. The index 01 of the part nr. (19798-300.01) indicates the EPROM version.

Grundig   CUC1805 CTV
Service Mode
Press 'i'. Dialog Center --> Service --> 'for authorized dealer' --> Code Number 8500.

94737
Modo serviço / Service Mode / Marca Gradiente
« em: Julho 31, 2008, 09:41:33 pm »
GRADIENTE GBT201   
Service
1)PRESSIONE SIMULTANEAMENTE AS TECLAS MENU NO CONTROLE REMOTO E NO PAINEL FRONTAL DO TELEVISOR POR ALGUNS SEGUNDOS
2)PARA SELECIONAR UM DETERMINADO ITEM DA TELA, UTILIZE AS TECLAS DO CURSOR DO CONTROLE REMOTO
3)PARA SELECIONAR OS MENUS DE AJUSTE, PRESSIONE MENU NO CONTROLE REMOTO
4)PARA SAIR DO MODO DE SERVIçO PRESSIONE DISPLAY NO CONTROLE REMOTO

GRADIENTE TV1421   
Service
1)PRESSIONE SIMULTANEAMENTE AS TECLAS MENU NO CONTROLE REMOTO E NO PAINEL FRONTAL DO TELEVISOR POR ALGUNS SEGUNDOS
2)PARA SELECIONAR UM DETERMINADO ITEM DA TELA, UTILIZE AS TECLAS DO CURSOR DO CONTROLE REMOTO
3)PARA SELECIONAR OS MENUS DE AJUSTE, PRESSIONE MENU NO CONTROLE REMOTO
4)PARA SAIR DO MODO DE SERVIçO PRESSIONE DISPLAY NO CONTROLE REMOTO

GRADIENTE TV2021   
Service Mode:
1)PRESSIONE SIMULTANEAMENTE AS TECLAS MENU NO CONTROLE REMOTO E NO PAINEL FRONTAL DO TELEVISOR POR ALGUNS SEGUNDOS
2)PARA SELECIONAR UM DETERMINADO ITEM DA TELA, UTILIZE AS TECLAS DO CURSOR DO CONTROLE REMOTO
3)PARA SELECIONAR OS MENUS DE AJUSTE, PRESSIONE MENU NO CONTROLE REMOTO
4)PARA SAIR DO MODO DE SERVIçO PRESSIONE DISPLAY NO CONTROLE REMOTO

GRADIENTE NEXT TV 1420 / TV 2020 / TV 2920  TV
Service Mode
1)PARA SELECIONAR O MODO DE SERVIçO, PRESSIONE SIMULTANEAMENTE A TECLA MENU NO PAINEL DO APARELHO E A TECLA MENU NO CONTROLE REMOTO, POR ALGUNS SEGUNDOS.
2)PARA INICIAR OS AJUSTES UTILIZE A TECLA DOS CURSORES NO CONTROLE REMOTO.
3)PARA SELECIONAR O ITEM DESEJADO PRESSIONE A TECLA MENU, NO CONTROLE REMOTO.
4)UTILIZE AS TECLAS UP E DOWN DO CONTROLE REMOTO. 5)PARA SAIR DO MODO DE SERVIçO PRESSIONE DISPLAY NO CONTROLE REMOTO.

GRADIENTE HT-M299S  TV
Service Mode
1. TV EM STAND-BY
2. NO CONTROLE REMOTO PRESSIONE SIMULTANEAMENTE AS TECLAS STATUS E DISPLAY POR 15 SEGUNDOS.
3. TECLA POWER
4. PARA SELECIONAR O ITEM USE MENU UP / DOWN, PARA TROCAR OS VALORES USE MENU LEFT / RIGHT
5. PARA SAIR DO MODO DE SERVIçO PRESSIONE EXIT NO CONTROLE REMOTO

GRADIENTE GT-1430 / 1433 - GT-2030 / 2033  TV
Service Mode
1)PARA SELECIONAR O MODO DE AJUSTE, PRESSIONE SIMULTANEAMENTE A TECLA MENU NO PAINEL DO APARELHO E A TECLA MENU NO CONTROLE REMOTO.
2)PARA INICIAR OS AJUSTES UTILIZE A TECLA UP.
3)PARA SELECIONAR O ITEM DESEJADO UTILIZE AS TECLAS UP E DOWN DO CONTROLE REMOTO.
4)PARA EFETUAR O AJUSTE UTILIZE AS TECLAS VOL+ E VOL-.

GRADIENTE TV-2021  TV
Service Mode
Pressionar menu do controle remoto e simultâneamente menu do painel por alguns segundos

GRADIENTE TF-2952  TV
Service Mode
Pressione as teclas MENU da tv e do controle ao mesmo tempo e mantenha-as pressionadas até aparecer o menu de serviço. Para selecionar o item use as setas para esquerda ou direita. Para sair do item selecionado e voltar para o menu principal so service mode, aperte MENU. Para sair do service mode aperte DISPLAY.

GRADIENTE HT-M344  TV - HT
Service Mode
1- Ir para o menu, selecionar CLOCK SET.
2- Acertar o relógio para 3:21 AM. logo que se pressione "start clock" aparece a piscar "THANK YOU"
3- Enquanto está a piscar, pressionar MUTE e em seguida UP/DOWN. E neste momento já está no modo de serviço

GRADIENTE HT-M388  TV - HT
Service Mode
1- Ir para o menu, selecionar CLOCK SET.
2- Acertar o relógio para 3:21 AM. logo que se pressione "start clock" aparece a piscar "THANK YOU"
3- Enquanto está a piscar, pressionar MUTE e em seguida UP/DOWN. E neste momento já está no modo de serviço

GRADIENTE GT-2011  TV
Demo Mode
Sair do modo DEMO Aperte FUNÇÃO e VOL + ao mesmo tempo

GRADIENTE GT- 2015  TV
Demo Mode
Sair do modo DEMO Se a tv não sair do modo de demostração: Retirar por algum tempo a bateria da placa. Verificar se a bateria está boa. Se necessário retirar até o microprocessador. Recolocar a bateria e ou o processador.

GRADIENTE 1422 / 2022  TV
Demo Mode
Sair do modo DEMO
1)Retirar a bateria por alguns segundos.
2)Recolocar a bateria no local.
3)Aperte FUNÇÃO e VOL + ao mesmo tempo.
4)As vezes é necessário retirar o microprocessador também.


94738
Modo serviço / Service Mode / Marca CCE
« em: Julho 31, 2008, 09:36:12 pm »
CCE HPS-2971  CTV
Service: ATERRAR O PINO 78 DO MICRO (SE FOR O TDA9570).

CCE HPS 2001 
TV Service Mode
PRESSIONAR A CHAVE DE SETUP LOCALIZADA NA PCBOARD.

CCE HPS 1402/2004  TV
Service Mode ATERRAR O PINO 35 DO MICRO ATé SURGIR NA TELA AS OPçõES DE AJUSTE.
PARA ENCERRAR PRESSIONE STAND-BY E MENU.

CCE HPS - 33-R  TV
Service Mode
ATERRAR O PINO 45 DO MICRO ATé SURGIR NA TELA AS OPçõES DE AJUSTES.

CCE HPS-1405 / HPS-2005 / HPS-2706C  TV
Service Mode
CONECTAR O PINO 24 DO IC701(MICROPROCESSADOR) A TERRA DURANTE +/- 5 SEGUNDOS (ATé QUE APAREçA NA TELA O MENU DE SERVIçO).

CCE HPS - 1402 / 2004  TV
Service Mode
ATERRAR O PINO 35 DO MICRO ATé SURGIR NA TELA AS OPçõES DE AJUSTES.

CCE HPS 1402 / HPS 1404 / HPS 2002 / HPS 2004 / HPS 2006  TV
Desbloquear 1.- TELEVISOR UTILIZANDO IC701 E IC702 NO PCI 1)DEIXAR O TELEVISOR EM STAND BY 2)UTILIZE A TECLA VOLUME + NO TELEVISOR MANTENDO PRESSIONADA POR MAIS DE VINTE SEGUNDOS 3)SEM SOLTAR A TECLA VOLUME PUXE O CABO DA REDE 4)SOLTE A TECLA VOLUME 5)CONECTE O CABO DE FORçA NA TOMADA E LIGUE O TELEVISOR. 2.- TELEVISOR UTILIZANDO SOMENTE O IC701 NO PCI 1)DEIXAR O TELEVISOR EM STAND BY 2)UTILIZAR O CONTROLE REMOTO DO TELEVISOR PRESSIONANDO, NA SEQüêNCIA, AS SEGUINTES TECLAS: 3)TECLA P.CH - POR MAIS DE 2 SEGUNDOS 4)TECLA OSD - UM TOQUE 5)TECLA MUDO - UM TOQUE 6)TECLA SLEEP - MANTER PRESSIONADA ATé O TV LIGAR. DESBLOQUEIO PARA MODELOS HPS 2902 / HPS2904 1)DEIXAR O TELEVISOR EM STAND BY 2)UTILIZAR O CONTROLE REMOTO DO TELEVISOR PRESSIONANDO, NA SEQüêNCIA, AS SEGUINTES TECLAS: 3)TECLA P.CH - POR MAIS DE 2 SEGUNDOS 4)TECLA OSD - UM TOQUE 5)TECLA MUDO - UM TOQUE 6)TECLA P.SKIP - MANTER PRESSIONADA ATé O TV LIGAR.

CCE HPS-1402  TV
Service Mode
pressionar a tecla SERVICE na placa principal cerca do "micro". Con CANAL +/- selecciona o parámetro, con VOL +/- ajusta o valor

CCE HPS-2002  TV
Service Mode
pressionar a tecla SERVICE na placa principal cerca do "micro". Con CANAL +/- selecciona o parámetro, con VOL +/- ajusta o valor

CCE HPS-1404  TV
Service Mode
pressionar a tecla SERVICE na placa principal cerca do "micro". Con CANAL +/- selecciona o parámetro, con VOL +/- ajusta o valor

CCE HPS-2004  TV
Service Mode
pressionar a tecla SERVICE na placa principal cerca do "micro". Con CANAL +/- selecciona o parámetro, con VOL +/- ajusta o valor

CCE HPS-1405  TV
Service Mode
Conectar a terra durante 5 segundos o pin 24 do IC701 (Micro). Con CANAL +/- selecciona o parámetro, con VOL +/- ajusta o valor

CCE HPS-2005  TV
Service Mode
Conectar a terra durante 5 segundos o pin 24 do IC701 (Micro). Con CANAL +/- selecciona o parámetro, con VOL +/- ajusta o valor

CCE HPS-2706C  TV
Service Mode
Conectar a terra durante 5 segundos o pin 24 do IC701 (Micro). Con CANAL +/- selecciona o parámetro, con VOL +/- ajusta o valor

CCE HPS-2910  TV
Service Mode
CHAVE SW702 QUE PASSA PELO R714 E VAI AO PINO 45 DO MICRO. SE NÃO TIVER, É SÓ CURTOCIRCUITAR O PINO 45 A TERRA POR ALGUNS SEGUNDOS E VER SE APARECE O MODO DE SERVIÇO. PARA ENCERRAR, PRESSIONE STAND-BY E MENU.

CCE HPS - 1407 / 2007  TV
Service Mode
1-Ligue o pino 78 do IC (TDA 9570H) a terra durante cerca de 5 segundos
2-Após este procedimento a tela de serviço será apresentada, indicando SERVICE MODE
3-Selecione as opções através das teclas CH+ ou CH- no painel frontal do televisor ou no controle remoto.
4-Ajuste a opção selecionada com teclas VOL+ ou VOL-
5-Para sair do menu de serviço, pressione a tecla OSD/OUT no controle remoto.

CCE HPS 2003  TV
Service Mode
PRESSIONAR TECLA SW702 (SERVICO) PERTO (MICRO) E DA (MEMÓRIA) ACCIONE A TECLA OSD NO CONTROLE, SELECCIONE A OPÇÃO DESEJADA. PRESSIONANDO TECLA CAN + OU CAN - SE NECESSÁRIO ALTERAR BITS AS TECLA VOL + OU VOL - AJUSTE PODE SER NO CONTROLE OU NO PRÓPRIO TECLADO DO TV. CASO NÃO TENHA ESSA CHAVE, ENTÃO FAÇA O SEGUINTE: CONECTAR O PINO 24 DO IC701 MICRO A TERRA, DURANTE MAIS OU MENOS 5 SEG. ATÉ APARECER A TELA DE MENU DE SERVIÇO. OU PINO 35

CCE HPS-1403  TV
Remover Bloqueio
P-CH (por 5 seg) osd (1 toque) mute (1 toque) sleep (manter pressionada até ligar)

CCE HPS-2003  TV
Remover Bloqueio
P-CH (por 5 seg) osd (1 toque) mute (1 toque) sleep (manter pressionada até ligar)

CCE HPS-2004  TV
RESET
1.- Televisor utilizando IC701 e IC702 no PCI - deixar o televisor em stand by - utilize a tecla volume + no televisor mantendo pressionada por mais de vinte segundos - sem soltar a tecla volume puxe o cabo da rede - solte a tecla volume - conecte o cabo de força na tomada e ligue o televisor.
2.- Televisor utilizando somente o IC701 no PCI - deixar o televisor em stand by - utilizar o controle remoto do televisor pressionando, na seqüência, as seguintes teclas: Tecla P.CH - por mais de 2 segundos Tecla OSD - um toque Tecla MUDO - um toque Tecla SLEEP - manter pressionada até o TV ligar.

CCE HPS 2092 2001  TV
Service Mode
Pressionar a tecla sw 702 esta entre ic 701 e ic 702 na tela aparecerá as seguintes informações CTV version 00.00xx* h parab.31 0-63 accione a tecla OSD no controle remoto para opção canal + canal - para ajustar vol+ e vol-


94739
Modo serviço / Service Mode / Marca BEKO
« em: Julho 31, 2008, 09:30:52 pm »
BEKO   CTV Service Mode
Pressione ao mesmo tempo P+ e P- no painel do televisor e ligue-o.


BEKO AT3 AT-3 TV
Service Mode Service
Mode adjustments:
1-White balance Adjustment- Switch on TV over mains while pressing up/down buttons on control unit.
2-Push balance on remote.
3-push colour button 


BEKO K1 TV
Service Mode Press the {MENU} button on the remote. Then press the {9} {3} {0} {1} buttons on the remote. The Service Menu will be displayed. Use the {PRG +} {PRG -} buttons to select options. Use the {VOL+} {VOL -} buttons to change settings. To exit, press the {TV/TXT} button


BEKO 12.6 12.6 TV
Service Mode Com o comando de Service: Carregar no botão 'Service In/Out' Com o comando da tv: Colocar no menu de control da imagem e digitar 8500. Botões do teletexto: Vermelho, Verde e Azul dão acesso ao Feature Setup,Geometry, White balance e AFC respectivamente.Para ajustar teclas: Vol+/-. Para sair tecla '0'.


BEKO 12.5 TV
Service Mode Take any old Philips remote control that has a separate "CONTRAST-" button. This button will work as SERVICE-IN and SERVICE-OUT. Alternatively take any universal remote control and program it for a Philips TV. Use CONTRAST- button as above. If you have TopTel or Meliconi universal remote control. Enter Philips code 317 and the SERVICE-IN/OUT button is subcode 238. Alternatively take original Beko user's remote control apart and fit a tactile switch to pins 10 and 17. This tactile switch will work as SERVICE-IN/OUT. Once in the service mode: press the RED button for options menu; press GREEN for geometry adjustments; press YELLOW for RGB adjustments; press BLUE for AFT adjustments;


94740
Projectos e circuitos electrónicos / Vários Circuitos Inversores
« em: Julho 31, 2008, 09:22:39 pm »
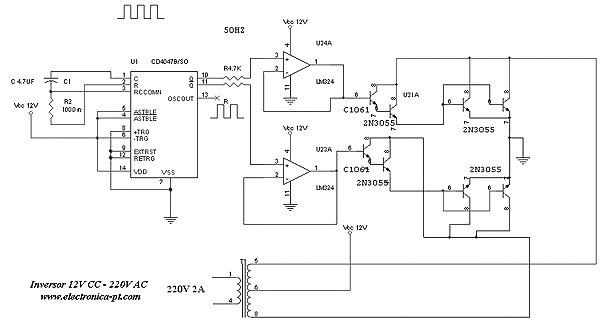
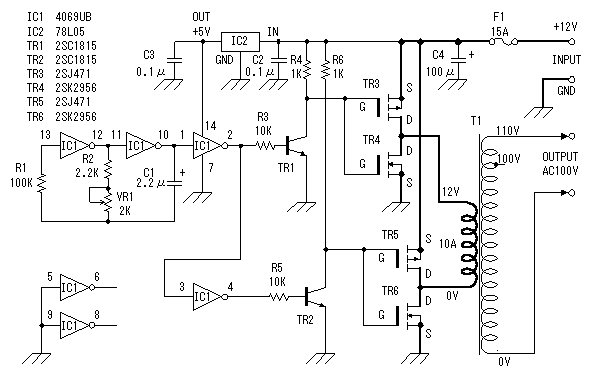
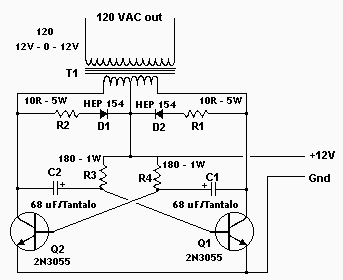
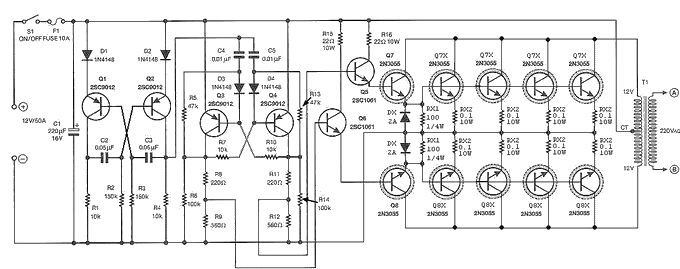
Um inversor ou conversor é um equipamento electrónico destinado a converter uma corrente directa de uma bateria (acumulador) em corrente alternada tal como a recebemos da empresa que nos fornece electricidade para consumo. A UPS (nobreak ) o equipamento que utilizamos quando falta a energia e que substitui a energia de rede não é mais do que um circuito electrónico inversor. Este tipo de circuitos é composto por várias etapas
Etapa osciladora.
Esta parte do circuito encarrega-se de gerar uma oscilação igual à oscilação que o fornecedor de serviço de electricidade nos fornece na entrada de rede. Para alguns países esta frequência é de 50Hz noutros 60 Hz

Etapa amplificadora.
O circuito amplificador num inversor destina-se a elevar o valor dos pulsos do oscilador de modo a que esses pulsos de oscilação sejam utilizados pela etapa elevadora de tensão.

Etapa elevadora.
Encarrega-se de elevar a tensão a 120 ou 220 V, esta função está a cargo de um transformador elevador.

Etapa de fornecimento de corrente directa.
Esta etapa é composta pelos acumuladores de corrente (Baterias)

Etapa de fornecimento de corrente alterna.
Esta etapa recebe a corrente do sector, permite carregar as baterias se a carga for feita pelo sector publico.

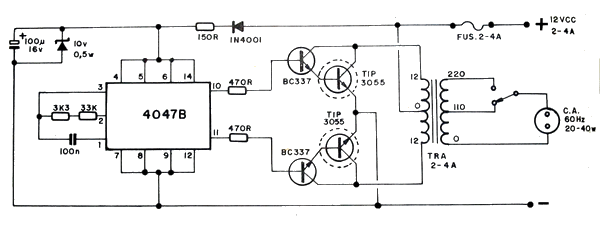
 Circuito Inversor 12V CC - 110-220V AC - 20-40W


----------------------

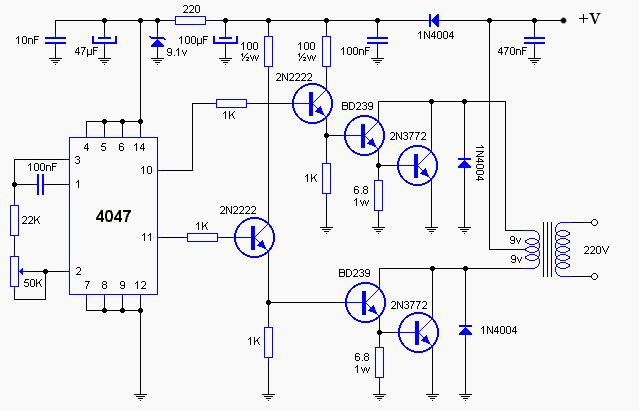
Inversor 12V CC - 220V AC - 100W


----------------------

Circuito inversor 500W - 12V - 220V


----------------------

Inversor 12V DC - 110V AC


----------------------

Inversor 12V - 120V


----------------------

Inverter 12V - 500W


----------------------

Em anexo circuito inversor 3000w

Páginas: 1 ... 4735 4736 [4737] 4738 4739 ... 4743